Hey there, let’s cut to the chase—if you’ve been scrolling home reno TikTok or Pinterest and spotted that warm, textured bamboo wall cladding, you’re probably wondering: “Can a regular DIYer like me actually put this up, or do I need to beg my cousin’s contractor friend to help?” As someone who’s spent the last 7 years selling bamboo wall cladding directly to folks who are just trying to spruce up their living room, basement, or backyard patio, I’m here to break this down real—no fancy industry jargon, no “it’s impossible” or “it’s a breeze” lies. Let’s get into it. Bamboo Wall Cladding
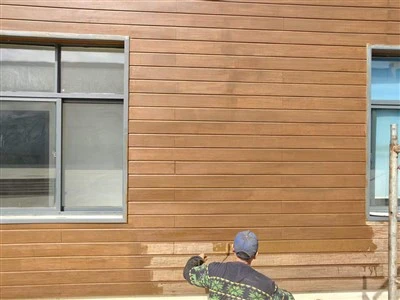
First, let’s talk about what bamboo cladding actually is, because not all bamboo is made equal (this is the part where my supplier hat comes in, no brag—just facts). A lot of cheap online stuff is thin, flimsy, and made with glued-together bits that warp if you look at them wrong. The stuff my team sells? It’s engineered to be stable—we source it from FSC-certified farms, kiln-dry it to a super specific moisture content (around 12%, which is the sweet spot for indoor humidity in most homes), and press it with a low-VOC adhesive so it doesn’t off-gas. That’s a big deal for DIYers because stability = less frustration during install. If your cladding doesn’t warp mid-measure or mid-cut, you’re already halfway to a win.
Now, let’s get to the actual install part—because that’s what you’re here for. I’ve had hundreds of DIYers buy our cladding and message me halfway through their project asking, “Am I being dumb here?” The short answer? Most of the time, no—if you have basic tools and a little patience. Let’s break down the steps, like I’d walk a first-timer over the phone.
First, prep. This is the part most DIYers skip, and it’s the #1 reason they end up hating their install. You can’t just slap bamboo onto a bare drywall or concrete wall without prepping. Here’s what you need to do: Clear the wall, patch any holes, sand down any rough spots, and most importantly—make sure the wall is perfectly flat. Wait, how do you check that? Grab a 4-foot level (not a tiny torpedo level, that’s useless for big walls) and run it all over the surface. If there’s a gap bigger than a credit card under the level, you need to fill it with joint compound (for drywall) or a concrete patching compound before you do anything else. Bamboo is rigid, so if the wall is uneven, your cladding will have gaps, or even worse, pop off later. I always tell first-timers: Prep 1 day, install 1 day, skip prep and you’ll spend 3 days fixing mistakes.
Next, tools. You don’t need a contractor’s full truck—just the basics. A drill (cordless is non-negotiable, trust me), a drill bit for your wall (masonry bit if it’s concrete, drywall bit if it’s drywall), a tape measure (metric is fine, imperial works too—just use what you already have), a pencil, a circular saw? Wait, no—wait, we sell our cladding in pre-cut lengths for most standard walls, so a circular saw is optional. If you have to cut it, a miter saw or even a fine-tooth handsaw works too. A level, obviously, and construction adhesive—we recommend a heavy-duty, water-based adhesive that works on wood and walls, because it’s easy to clean up if you mess up, and it holds strong. Oh, and caulk—paintable acrylic caulk for the edges, so you cover any gaps where cladding meets trim or the ceiling. That’s it. No fancy stuff.
Now, the actual install. Let’s say you’re doing a feature wall in your living room. Start at the bottom—yes, bottom. Work your way up, like tiling, but easier. Apply a thin bead of adhesive to the back of the first panel, then press it firmly to the wall, holding it for 10-15 seconds to make sure it sticks. Then, use your drill to drive a few small finish nails (or trim head screws—they’re less noticeable) along the top and bottom edges of the panel, every 12 inches or so. Don’t over-drive the screws—you don’t want to split the bamboo. Once that first panel is up, use your level to double-check it’s straight, because this is your guide for every panel after. If the first one is crooked, the whole wall will be.
Here’s where a lot of DIYers panic: cutting panels to fit around outlets, windows, or corners. Let’s be real—cutting around an outlet is not as hard as it looks. For a standard outlet, hold the panel over the outlet, trace the outline of the box onto the back of the panel, then cut that rectangle out with a jigsaw (another basic tool—most people have one, or can borrow it). Wait for the adhesive to set, then fit the panel around the outlet. For corners? We sell our cladding with matching edge trim, so you don’t have to try to cut a perfect miter joint (which is hard even for people who do this for a living). The trim just clicks or nails on, super straightforward.
Now, let’s talk about the hard parts—because it’s not all smooth sailing, and I don’t want to lie to you. The biggest hurdles for DIYers are two things: measuring accurately, and working with uneven walls. I can’t tell you how many times a customer has measured their wall, rounded up, and ended up with a panel that’s ½ inch too long. Don’t round up—measure twice, cut once, but also leave a tiny gap (like ⅛ inch) at the ceiling and floor. Walls aren’t perfectly level, and that gap will let you adjust the panel without forcing it. The other hard part is concrete walls. If you’re installing on a concrete basement wall, you’ll need a masonry drill bit and concrete screws instead of just adhesive. But even that’s doable—no special skills, just take your time drilling the right size hole.
Wait, but let’s be fair—when is it not easy for DIYers? If you’ve never used a drill before, or you get stressed out by measuring and cutting small things, maybe this isn’t your first reno project. I’ve had a customer who did their entire living room wall by themselves, and another who bought the cladding, opened the box, and texted me 10 minutes later saying “I don’t know what I’m doing.” It’s not for someone who wants a 1-hour project with zero effort. But if you’re the type who watches a few 5-minute YouTube tutorials, reads the instructions that come with the cladding, and takes your time, you can totally do this.
Also, let’s talk about why DIYing this is worth it, because that’s probably the other part on your mind. Hiring a contractor to put up cladding would cost you at least $500-$1,000 for a single wall, depending on size. The bamboo cladding itself from us is around $200-$400 for a standard 10×10 wall, so DIYing saves you a ton of cash. And the end result? That warm, natural bamboo texture that makes any room feel cozier, without the high price tag of real hardwood panels.
Wait, let’s add a quick real customer story to make this not just me rambling. Last month, a guy named Jake from Detroit bought 12 panels of our charcoal bamboo cladding for his basement. He messaged me after finishing: “I’ve never done anything more complicated than hanging a shelf, and this took me one weekend. The only mistake I made was measuring wrong for the outlet above my TV, but I just sanded the edge and no one can even tell.” That’s the kind of stuff I love hearing—regular people pulling this off, no fancy skills.
Now, if you’re ready to give it a go, here’s my quick pro tip list to make it even easier: First, watch 2-3 YouTube videos of someone installing this exact bamboo cladding (search “DIY bamboo wall cladding install” and pick the ones with real DIYers, not contractors flexing). Second, order one extra panel—cuts always go wrong, and you’ll have a spare if you mess up a piece. Third, test the adhesive on a scrap piece of bamboo before you start, just to make sure it’s strong enough.
At the end of the day, bamboo wall cladding is not impossible for DIYers. Is it as easy as hanging wallpaper? No, that’s a whole other level. But if you have basic DIY skills, the right tools, and a little patience, it’s totally doable. You don’t need to be a pro to get that sleek, warm wall you’ve been scrolling past for months.
If you’re ready to pick out your bamboo wall cladding, or have questions about install tips specific to your space, feel free to reach out for more details on availability and project guides. Don’t stress—you’ve got this.
Bamboo Wall Cladding References
- Forest Stewardship Council. (2023). Bamboo as a Sustainable Building Material. FSC International.
- National Kitchen and Bath Association. (2022). Basic Tools for Residential DIY Wall Projects. NKBA.
- International Code Council. (2021). Adhesive Requirements for Interior Wall Cladding. ICC.
- Kiln-Dried Lumber Council. (2022). Optimum Moisture Content for Interior Wood Finishes. KDL Council.
Ningguo Kungtai Bamboo and Wood Co., Ltd.
As one of the most professional bamboo wall cladding manufacturers and suppliers in China, we warmly welcome you to wholesale bulk customized bamboo wall cladding from our factory. If you have any enquiry about quotation, please feel free to email us.
Address: East of Huanggang Road, Ningdun Town, Ningguo City, Anhui Province
E-mail: office@hh-bamboo.com
WebSite: https://www.kungtaibamboo.com/
